Local Links
External Links
Contact
Search this site
Using SmartGit with Real Studio projects

SmartGit is a graphical front-end for the distributed version control system Git and runs on Windows, Mac OS X and Linux.
I will show here how to use it to manage revisions of REALbasic (Real Studio) projects, optionally using Arbed to show differences between revisions.
The instructions here can also be applied to SmartSVN, the alternative client for SubVersion (If you start a new project and can choose between SubVersion and Git, I recommend Git as it's more modern and more capable than SubVersion).
Setting up SmartGit to store your projects
Choosing the right format
You can go two ways to store your projects for use with Git (or SVN):
- Use the "VCP" format, where Real Studio stores each class as a text file, mostly ending in ".rbbas".
- Use the "RBP" or "XML" formats, where Real Studion stores the entire project (apart from external items) in a single file with its names ending in ".rbp" or ".xml".
If you use the VCP format, things are straight-forward. You do not even need to consider using Arbed, as the files are already in a well-readable text format that allows you to see differences between revisions fairly well - though Arbed will still be able to show you (and filter) the changes better than a plain text diff tool ever can.
If you choose to use the other formats, however, seeing differences becomes difficult. Here, Arbed can be used to display the differences in a way that's even better than what you'll get with the VCP format.
Why choose the RBP or XML formats at all?
The RBP and XML formats support storing individual classes in separate locations on disk, allowing you to share the same project items (classes etc.) between multiple projects. The VCP format doesn't support that.
Setting up Git to manage your project revisions.
No matter which format you choose, you'll use the same steps to use Git to manage your source code:
With SmartGit, this step is very easy.
- Launch SmartGit, then choose from the menu: Project -> Open Working Tree...
- Press the Choose... button to choose the folder which contains your project files and all other files that you want to keep revisions of.
- Once you've chosen the "Git Working Tree" folder, press "Continue".
- You'll be asked: "Should a Git working tree be initialized?". Confirm that.
- Next you get to name your project as it'll appear in SmartGit. Press "Finish".
Now SmartGit shows you a window for the new project, with a left pane containing the folder tree and a right pane showing the files in the selected folder.
The listing will probably contain a lot of files and folder you do not want to manage as revisions, such as the built application and maybe a Build folder. You should now tell Git to ignore all those items you do not need to version controlled by selecting either the entire folder or single files, and then choose from the menu "Local" -> "Ignore". I suggest not to include the ".gitignore" in the ignored items so that it gets version controlled as well. This will be convenient later if you choose to share the git project.
Eventually you should only have those files listed of which you want to record updated versions. That'll be your source files (ending in ".rbp", ".xml", ".rbvcp", ".rbbas" etc.) and maybe other files such as documentation, images and even plugins (I usually store any used plugins along with each project so that I know which plugins are used by which project).
Lastly, you need to commit these files to Git's repository so that Git learns the initial version of these files, letting it track any changes to them thereafter.
To commit them, simply select all files (to see all files, first select the top folder in the left pane, and also make sure you've checked the "View Files from Subdirectories" option). Then press the "Commit" button in the window's toolbar. A dialog window opens in which you can enter a description. Enter something like "initial version" and press "Commit". After a few seconds, SmartGit should show an empty list (provided you've unchcked the View option for "Unchanged Files"). This empty list tells you that there's nothing changed in your project that needs to be committed to the Git repository.
With that, Git is set up to manage your project.
As a test, make a little change to your project, e.g. add a comment somewhere. Save the project. Then go back to SmartGit. It should now list at least one file that's marked as "Modified" in the "Working Tree State" column.
Select these modified file(s) and press "Commit" again. Enter an new commit message, e.g. "test change", and press Commit. That will store the updated version of the file(s) in the Git repository (which is a hidden folder inside your chosen project folder).
Viewing differences between revisions
If you're using the VCP format, SmartGit can show you the changes between the revisions directly. Simply double click on any file that's marked "modified" and you'll get a new window in which the last commited version is compared to the currently modified version.
Setting up SmartGit to use Arbed as a diff viewer for Real Studio project files
You can have Arbed show the differences of your projects in a well structured way instead of viewing them as plain text differences:
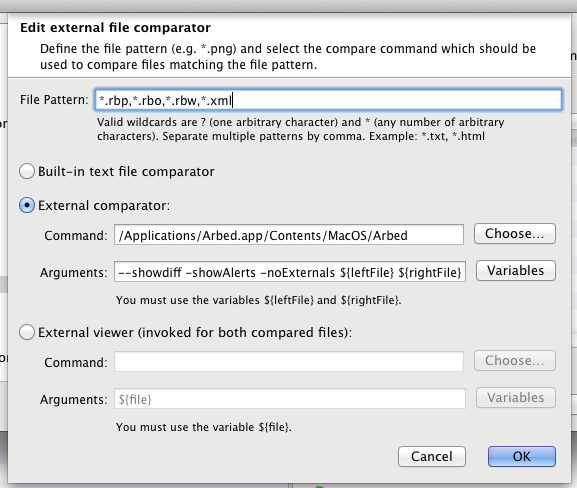
- Open SmartGit's Preferences (Settings) window
- Go to Tools -> Diff Tools
- Click "Add..."
- Under "File Pattern", enter: *.rbp,*.rbo,*.rbw,*.xojo_binary*
- If you want to use the XML format, add also ",*.xml" to the pattern list
- Switch to "External diff tool:"
- Click the chooser button at the right of "Command:" and locate the Arbed application. On Windows, it's Arbed.exe, while on OS X go inside Arbed.app, into Contents, into MacOS and choose "Arbed" therein (you may have to go the Finder, right-click on Arbed.app, do "Show Package Contents", and then drag the opened folder into the "Select File" dialog in order to navigate into the .app bundle).
- Under "Arguments:", enter: --showdiff -showAlerts -noExternals ${leftFile} ${rightFile}
- Click "OK"
It should then look similar to this:
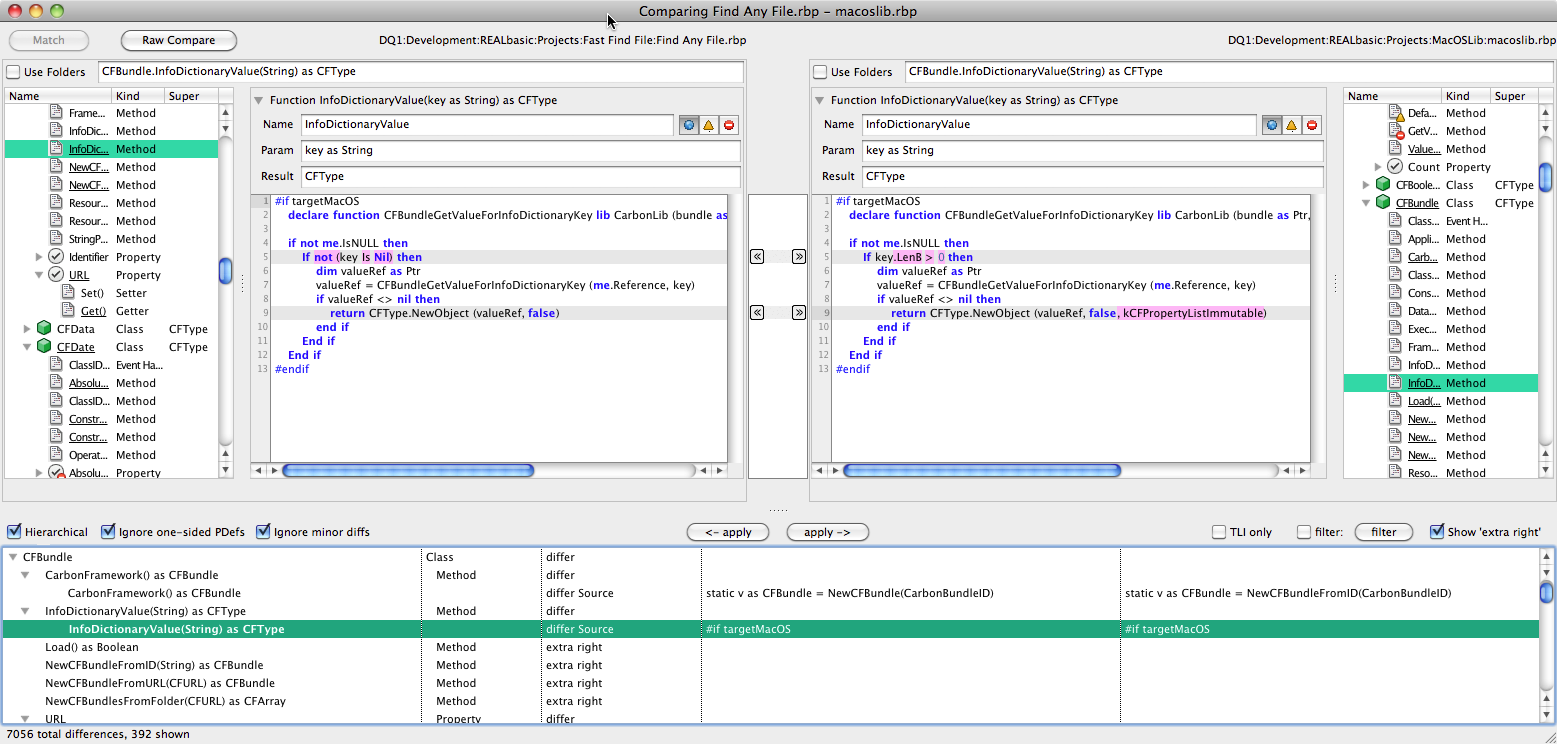
Now, next time to double click a modified file in SmartGit, Arbed will be launched and will show the differences like this.
Note that, on macOS, Arbed won't be brought to the front when you view the differences, i.e. you need to manually activate Arbed. To change that, you need to create a small shell script with this content:
    #!/bin/sh
    open /Applications/Arbed.app -Fn --args --showdiff -showAlerts -noExternals "$1" "$2" &>/tmp/arbed.txt
Fix the path to the Arbed.app as need. Save it, e.g. as "ArbedDiff.sh" and then choose this script file as the Command instead, and with only ${leftFile} ${rightFile} as its arguments.